Lighting & optics
Machine vision lighting: how to choose the right technique
Lighting makes or breaks a machine vision inspection. A practical guide to backlight, ring light, dome, coaxial, dark-field and structured lighting.
Ask any experienced vision engineer what matters most in an inspection system, and most will say the same thing: lighting. A clever algorithm can't recover information that isn't in the image, but the right light can turn a hard inspection into an easy one.
The goal of machine vision lighting is simple to state: make the feature you care about as different as possible from everything else, and keep it that way from part to part. Here's how to get there.
Start with what you need to see
Before choosing a light, be clear about what the camera needs to detect. The right technique depends on it:
- Outlines and dimensions: you want a crisp, high-contrast edge.
- Surface defects like scratches and dents: you want the defect to scatter light differently from the good surface.
- Print, marks and codes: you want even illumination with no glare over the characters.
- Features on shiny or curved parts: you want to eliminate reflections and hot spots.
Also consider the part's surface: matte or shiny, flat or curved, light or dark, transparent or opaque. The same light can work beautifully on one surface and fail completely on another.
The main lighting techniques
Backlight
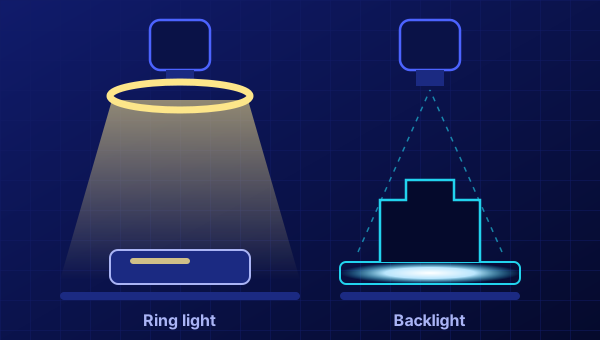
The light sits behind the part, facing the camera, so the part appears as a sharp dark silhouette on a bright background. Backlighting gives the highest possible edge contrast, which makes it the first choice for gauging outlines, holes and gaps, and for checking presence. The trade-off: you see only the silhouette, not the surface.
Ring light (direct bright-field)
A ring of LEDs around the lens lights the part from the camera's direction. It's compact, affordable and a good general-purpose choice for matte parts, labels and printed surfaces. On shiny or curved parts, though, it produces a ring-shaped reflection that can hide exactly what you're looking for.
Dome light (diffuse)
A dome surrounds the part with soft, even light from almost every direction, like a cloudy day. This removes glare and hot spots on shiny, curved or uneven surfaces, such as metal cans, foil packs, rounded plastic parts and reflective components. Domes need to sit fairly close to the part, which can make mechanical integration trickier.
Coaxial light (on-axis diffuse)
Light is directed down the same axis as the camera via a beam splitter. Flat, reflective surfaces appear evenly bright, while scratches, dents and marks scatter the light away and appear dark. Coaxial lighting is ideal for flat shiny surfaces, such as polished metal, wafers and laser marks on reflective packages.
Low-angle (dark-field) light
Light hits the part at a shallow angle. A flat surface reflects it away from the camera and looks dark, while anything that sticks up or dips down, like a scratch, burr, embossed character or particle, catches the light and glows. Dark-field lighting is excellent for surface texture, engraved or dot-peened marks, and edge defects.
Structured light and laser lines
Projecting a line or pattern onto the part and viewing it from an angle reveals height information, because the line bends as the surface changes height. This is the basis of many 3D measurements, such as profiles, heights, volumes and coplanarity.
Quick reference
| Technique | Best for | Watch out for |
|---|---|---|
| Backlight | Outlines, dimensions, holes, presence | No surface detail |
| Ring light | Matte parts, labels, print | Glare on shiny parts |
| Dome | Shiny, curved, uneven surfaces | Must sit close to the part |
| Coaxial | Flat reflective surfaces, laser marks | Less effective on curved parts |
| Low-angle / dark-field | Scratches, texture, engraved marks | Sensitive to part height changes |
| Structured / laser | Height, profile, 3D shape | More complex setup and processing |
Use colour and wavelength to your advantage
The colour of the light matters as much as its direction. A feature lit with light of its own colour appears bright; lit with the opposite (complementary) colour, it appears dark. Red light makes a red mark almost disappear, while green or blue light makes it stand out.
- Infrared reduces the effect of colour variation between parts and can see through some inks and plastics.
- Ultraviolet makes fluorescent materials glow, which is useful for checking adhesives, coatings and seals that contain a fluorescent tracer.
Control the light you don't want
Ambient light from windows, overhead lights and nearby machines changes throughout the day, and it can quietly ruin an otherwise stable inspection. Common fixes include:
- Enclosures or shrouds to physically block stray light
- Strobing the light at high intensity for a short exposure, which overpowers ambient light and freezes motion
- Bandpass filters on the lens that pass only your light's wavelength
- Polarisers on the light and lens to suppress glare
Always test with real parts
Lighting theory gets you to a shortlist, but the final choice should always be made with real parts, including the worst examples you can find. Surfaces vary more between batches than most people expect, and a technique that works on three hand-picked samples may struggle on a full production run.
At AVT Solution, lighting and optics selection is one of the first things we work through in any vision project. If you'd like a second opinion on an inspection that isn't as reliable as it should be, send us a description. The fix is very often in the light.